
Compose: Create Timer Plans
Timer plans in Adhoro are edited and created in the Compose tab. This overview details the available configuration options to design the timer you require.
- Start Creating
- Your Timer Plan
- Set up a Sequence
- Set up a Countdown
- Set up a Stopwatch
- Set up a Choice
- Configure an Alert
- Configure an Extra Alert
Start Creating
When switching to the Compose tab and not already editing a timer plan, you see this start screen.
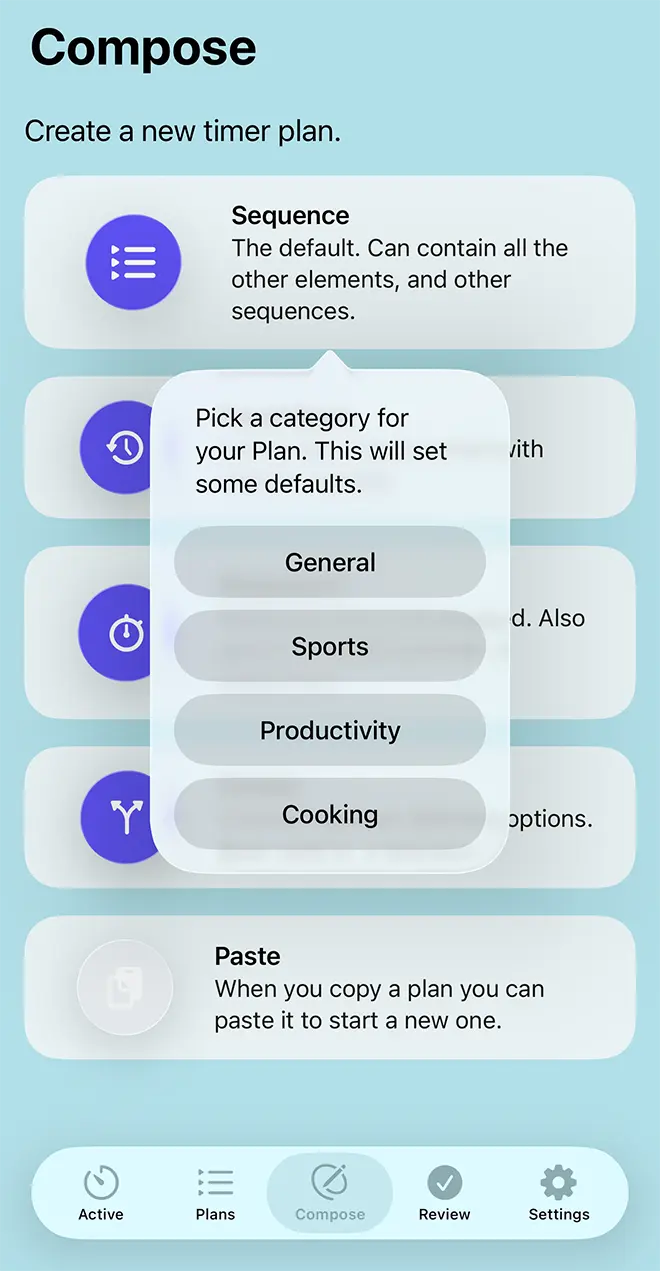
Next, you will be asked to pick a category. Right now, Adhoro has four categories: General, Productivity, Sport, and Cooking. Picking a category will set defaults for your new timer plan and any elements you may add to it: whether timers should usually be confirmed at the end, a default alert, and whether timers should run in full-screen mode. You can change these in the Settings tab for each category. You can change the category later, but those defaults will then only apply to new elements, not retroactively.
TopYour Timer Plan
The main screen for your new or edited timer plan will vary depending on what type of root element you chose. Detailed here is the layout for a sequence, the settings available for other elements reflect those in their respective sections (countdown, stopwatch, choice). This screen includes some settings for your overall timer and some that relate to that element. Those are detailed below, in their respective segments.
Name (1)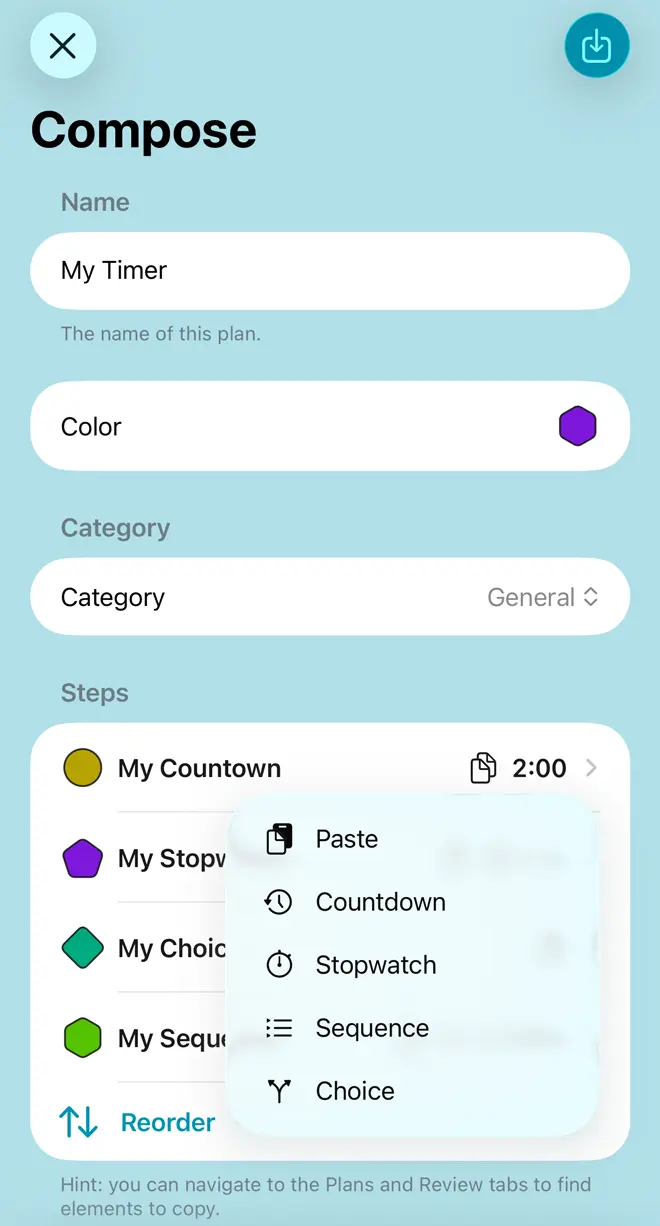
A name for your timer: shown in running timers and inspection screens and used for filtering in search fields.
Color (2)A color scheme for the overall timer. Variants are used to color the user interface of your timers and symbols in overviews.
Category (3)The category of this timer. This will be used for filtering in search fields, and to set defaults for newly added elements. The defaults for categories can be customized in the Settings tab.
Steps (sequence-specific) (4)The elements of your root sequence. Individual steps are listed with a symbol reflecting their type and in their color, along with their duration and any repeats. Tapping on any of them will lead to a screen to configure that element: this will be different, depending on whether that element is a sequence, countdown timer, stopwatch, or choice. Newly created sequences contain a single countdown timer element. You can remove elements by swiping them to the left. The Rearrange button allows you to reorder the elements in the sequence. The Add Button opens a context menu (5) to add a new element: another sequence, a countdown timer, a stopwatch, or a choice. Sequences must contain at least one element to be valid.
Copy and Paste (6)Copying and pasting elements is very useful for composing your timer plans quickly. Everywhere you see the copy icon in an element entry, the top bar, or a context menu, you can copy that element. You can then paste it into a sequence or choice to add a copy of that element, with all its features. Elements can not only be copied inside the Compose tab, but also from the Plans and Review tabs.
Save Your Plan (7)Once you have made any modifications, the Save Button will appear. Here you can save your edits and make the plan available for use in timers. When saving, you get the option to use the plan right away to start a timer. If you're editing an existing plan, you also get the option to save it as a new plan. Note that the templates that come with Adhoro can't be changed and after modifying them, you can only save them as a new plan.
Launch timer in full-screen mode (1)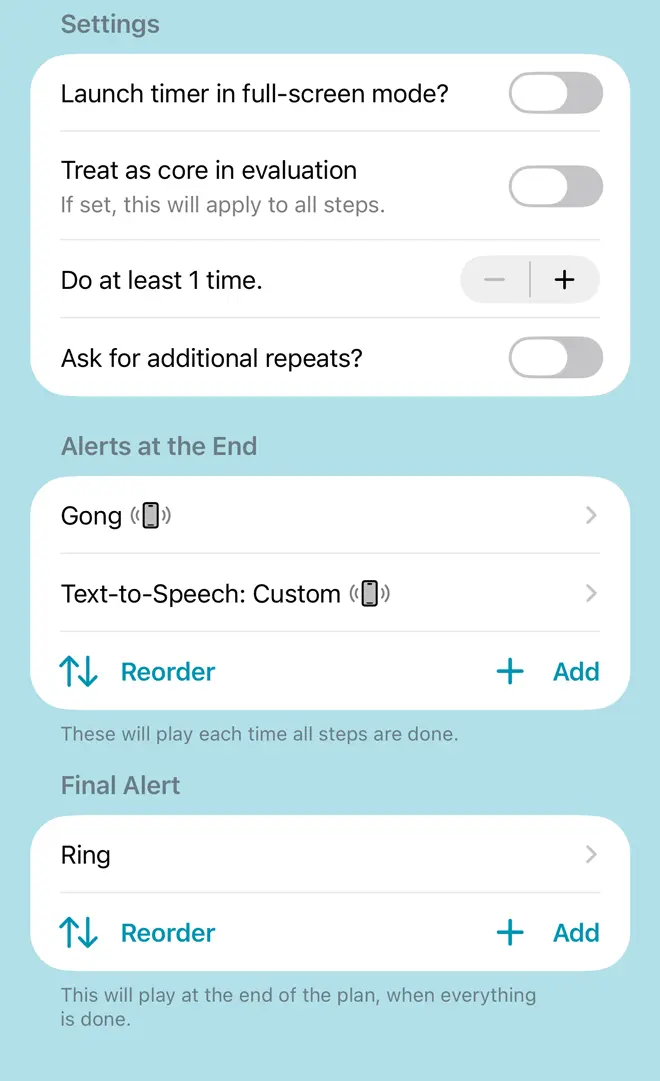
If this is picked, timers launched for this plan will launch in full-screen mode.
Treat as core in evaluation (2)Time spent on core elements is highlighted in results in the Review tab. Picking this here, for the overall timer, will apply this to any elements in the entire timer. So all elapsed time will be shown as core, though not time when the timer is paused or waiting for your input.
Do at least x time(s) (3)This sets repeats for your root element. So in this case, the root sequence will be repeated x times.
Ask for additional repeats (4)If set, once all included repeats are done, you will be offered a choice of an additional repetition when the timer is running.
Alerts at the end (5)This lets you set one or more alerts that are played when your root element is done. Each can be an audio signal, text-to-speech and/or vibration. The alerts will play in sequence every time the root element completes: that is for every repetition. You can remove alerts by swiping left, reorder them with the Reorder button and add additional ones with the Add button. Tapping an alert will lead to a configuration screen for that alert.
Final Alerts (6)As above, this lets you configure alerts. These will play when the entire timer is finished, after any repeats.
TopSet up a Sequence
Sequences are mainly the sum of the elements they contain. They allow you to configure separate repetitions or alerts, though.
Name (1)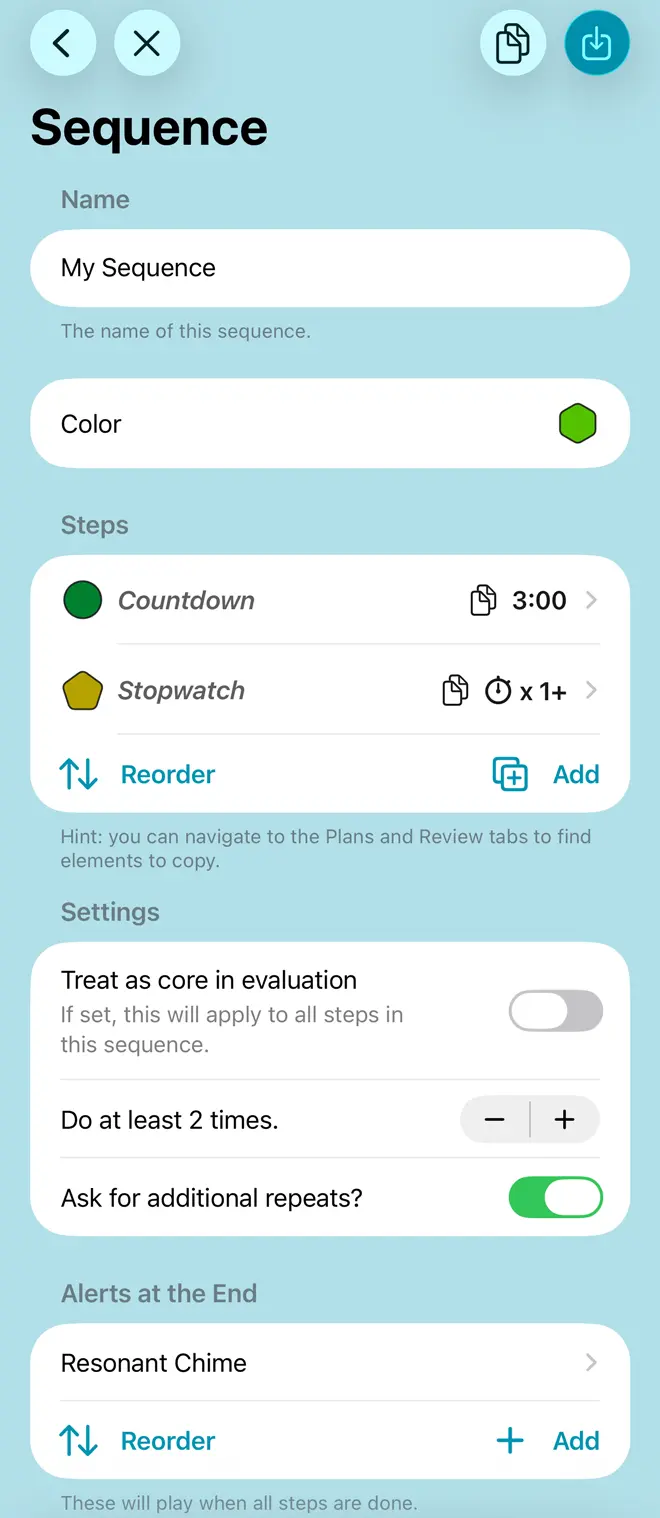
Select a name for this sequence. Sequence names are not seen that often in running timers: only when asking for extra repeats or in choices. You do see the name when inspecting or editing your timer plan, you can use it for text-to-speech alerts, and it is also used for filtering in searches.
Color (2)A color for this sequence element. For sequences, this is mainly used in the element symbol, when inspecting or editing your timer plan.
Steps (3)The heart of a sequence. Individual steps are listed with a symbol reflecting their type and in their color, along with their duration and any repeats. Tapping on any entry will lead to a screen to configure that element: this will be different, depending on whether that element is a sequence, countdown timer, stopwatch, a choice, or a pasted copy of another element. Newly created sequences contain a single countdown timer element. You can remove elements by swiping them to the left. The Rearrange button allows you to reorder the elements in the sequence. The Add button opens a context menu to add a new element: another sequence, a countdown timer, a stopwatch, or a choice. Sequences must contain at least one element to be valid.
Treat as core in evaluation (4)Time spent on core elements is highlighted in results in the Review tab. Picking this for a sequence will apply this to any elements in the sequence. So all elapsed time will be shown as Core, though not time when the timer is paused or waiting for your input.
Do at least x time(s) (5)This sets repeats for your element. So in this case, this sequence with all its elements will be repeated x times.
Ask for additional repeats (6)If set, once all included repeats are done, you will be offered a choice of an additional repetition when the timer is running.
Alerts at the end (7)This lets you set one or more alerts that are played when your sequence is done. Each can be an audio signal, text-to-speech and/or vibration. The alerts will play in sequence every time the sequence completes: that is for every repetition. You can remove alerts by swiping left, reorder them with the Reorder button and add additional ones with the Add button. Tapping an alert will lead to a configuration screen for that alert.
TopSet up a Countdown
If sequences are the bones, countdown timers will be the meat on most timers. Their main feature is their duration.
Name (1)
Select a name for this countdown. This is shown while the timer is running as well as in inspection, choice, and editing screens. It can also be used for text-to-speech alerts.
Color (2)A color for this element. Variations of this will be used for UI color when it is active during a running timer, and it is used for the element symbol in inspection, editing, and review screens.
Instructions (3)Instructions for this step. These are shown while this element is active in a running timer and can also be used for text-to-speech.
Duration (4)The heart of a countdown timer: how long it takes.
Treat as core in evaluation (5)Time spent on core elements is highlighted in results in the Review tab. Use this for periods you consider important for your task: work, high intensity exercise and so forth.
Do at least x time(s) (6)This sets repeats for your element. So in this case, this countdown will be repeated x times, each time producing alerts and potentially waiting for confirmation.
Ask for additional repeats (7)If set, once all included repeats are done, you will be offered a choice of an additional repetition when the timer is running.
Confirm step at the end (8)If this is active, the timer will halt and wait for you to confirm that this step has been completed. The alert will repeat until then, for up to 30 seconds. This is often what you want for general or kitchen timers, though not necessarily for exercise timers.
Alerts at the end (9)This lets you set one or more alerts that are played when your countdown is done. Each can be an audio signal, text-to-speech and/or vibration. The alerts will play in sequence every time the element completes: that is for every repetition. You can remove alerts by swiping left, reorder them with the Reorder button and add additional ones with the Add button. Tapping an alert will lead to a configuration screen.
Extra Alerts (10)Extra alerts can be placed at any point during the duration of a countdown element. Like end alerts, this is a freely configurable sequence of audio/text-to-speech/vibration signals. Additionally, you set the time at which the alert should be triggered. You can remove alerts by swiping left, reorder them with the Reorder button and add additional ones with the Add button. Tapping an entry will lead to a configuration screen.
TopSet up a Stopwatch
Stopwatches measure time and can add flexibility to sequences. Note that stopwatch elements need your interaction to start during a sequence. They will launch automatically if finishing the preceding element required input, like a confirmation and otherwise start in paused mode.
Name (1)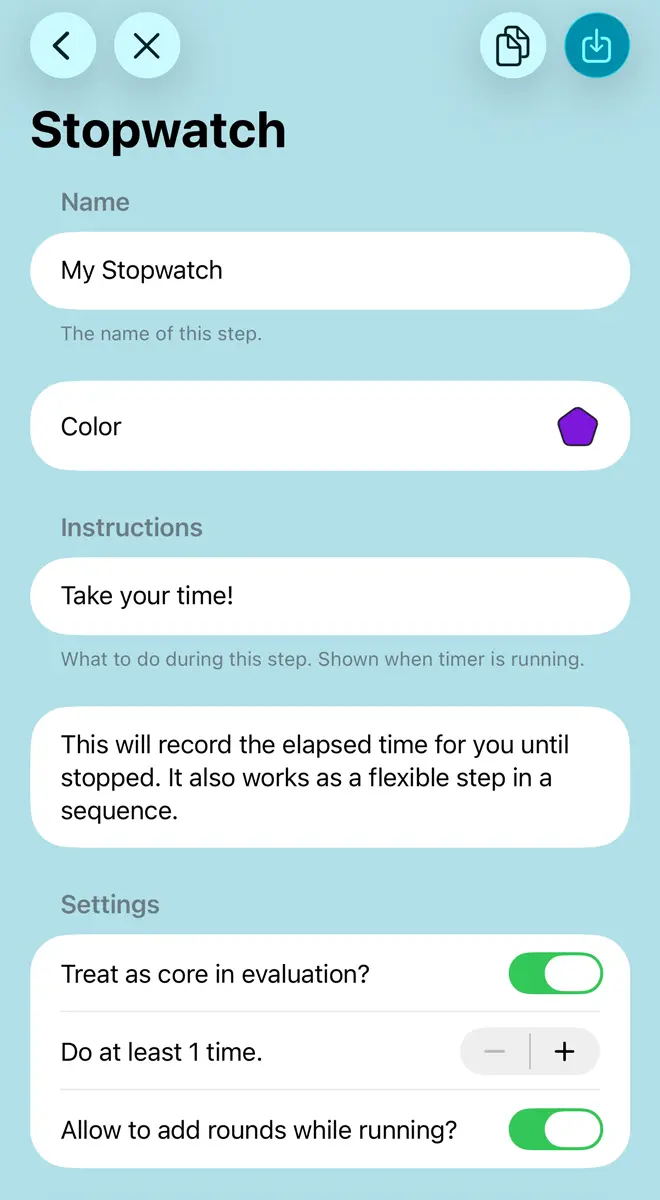
Select a name for this stopwatch. This is shown while the timer is running as well as in inspection, choice, and editing screens.
Color (2)A color for this element. Variations of this will be used for UI color when it is active during a running timer, and it is used for the element symbol in inspection, editing, and review screens.
Instructions (3)Instructions for this step. These are shown while this element is active in a running timer and can also be used for text-to-speech.
Treat as core in evaluation (4)Time spent on core elements is highlighted in results in the Review tab. Use this for periods you consider important for your task: work, high intensity exercise and so forth.
Do at least x time(s) (5)This sets repeats for your element. So in this case, this stopwatch will be repeated x times, each time recording the time taken.
Allow to add rounds while running (6)This lets you repeat this stopwatch while the timer is running, adding another round. Stopwatch timer elements have a special button for this. Using it will log the time on the current stopwatch and start another one.
TopSet up a Choice
Choices give you true flexibility during a timer, allowing you to select between options you define.
Name (1)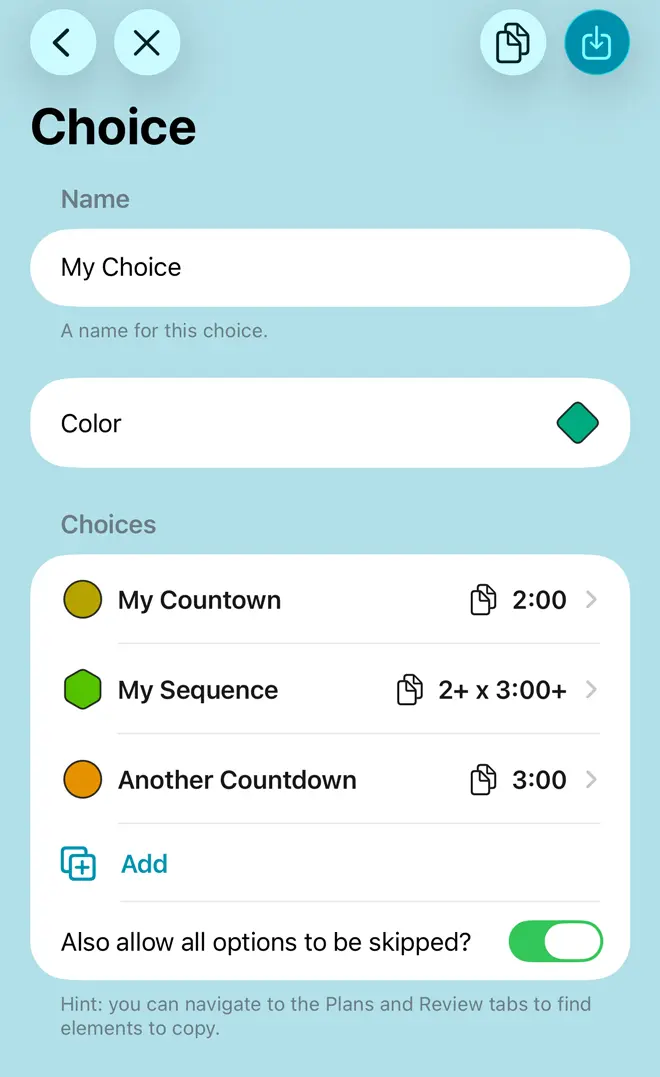
Select a name for this choice. This is shown while the timer is running as well as in inspection and editing screens. And other choices, should you decide to nest them.
Color (2)A color for this element. Variations of this will be used for UI color when the choice is shown during a running timer, and it is used for the element symbol in inspection, editing, and review screens.
Choices (3)The available options. Individual entries are listed with a symbol reflecting their type and in their color, along with their duration and any repeats. Tapping on any of them will lead to a screen to configure that element: this will be different, depending on whether that element is a sequence, countdown timer, stopwatch, or another choice. Newly created choices contain a single countdown timer element. You can remove elements by swiping them to the left. The Rearrange button allows you to reorder the elements. The Add button opens a context menu to add a new element: a sequence, a countdown timer, a stopwatch, a choice, or a pasted copy of another element. You can also decide if you want to allow all options to be skipped (4). Choices must offer, well, a choice and contain at least two options. If the choice can be skipped, one is sufficient. The maximum number of available options is 5.
TopConfigure an Alert
An alert is an audio, text-to-speech and/or vibration signal that you can use in end alerts for elements and extra alerts in countdowns. Choose from the available options. You can also play the alert tones to try them out.
Vibrate (1)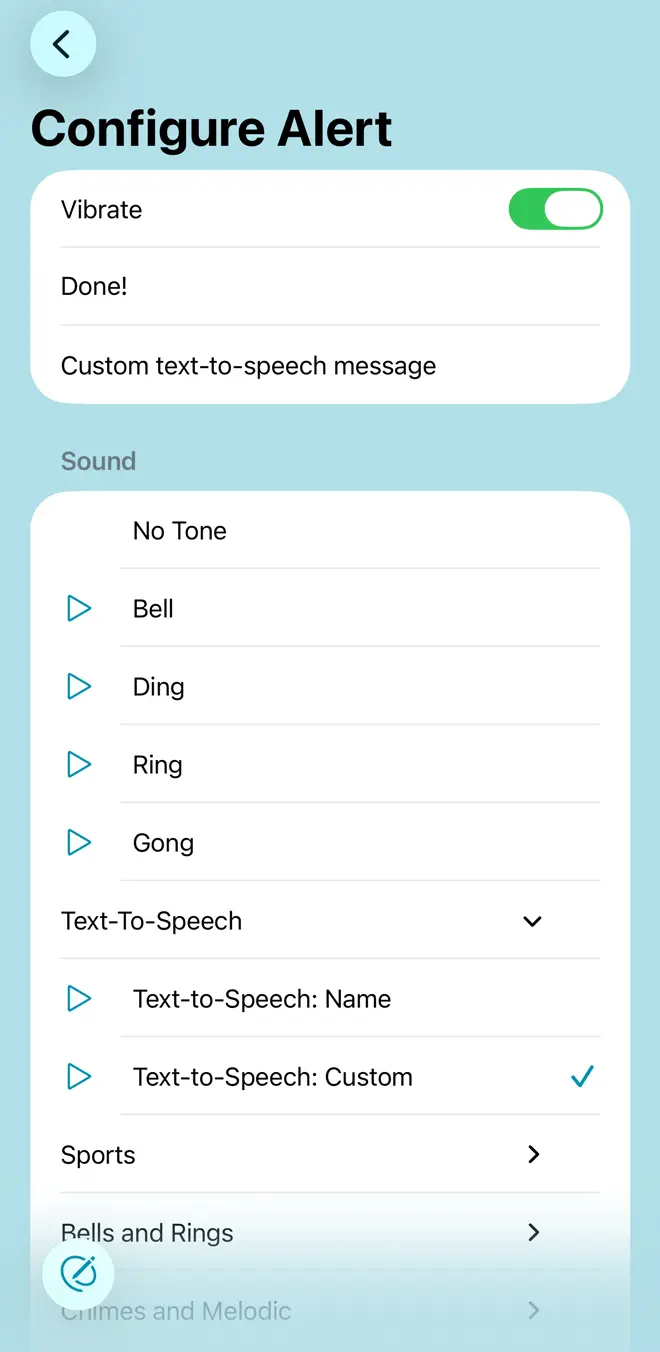
Decide if you want vibration as part of your alert. You can also select vibration without any other tone.
Text-to-speech options (2)There are three text-to-speech presets: name (the name of the element using the alert), instructions (the instructions on the element using the alert, if any), and a custom text. If you opt for custom text-to-speech (3), an additional input field appears. The voice for text-to-speech is selected automatically based on your language and region, but you can choose a specific voice in the settings tab.
TopConfigure an Extra Alert Sequence
Here you define alerts that will play at a specific time during a countdown timer.
Play At (1)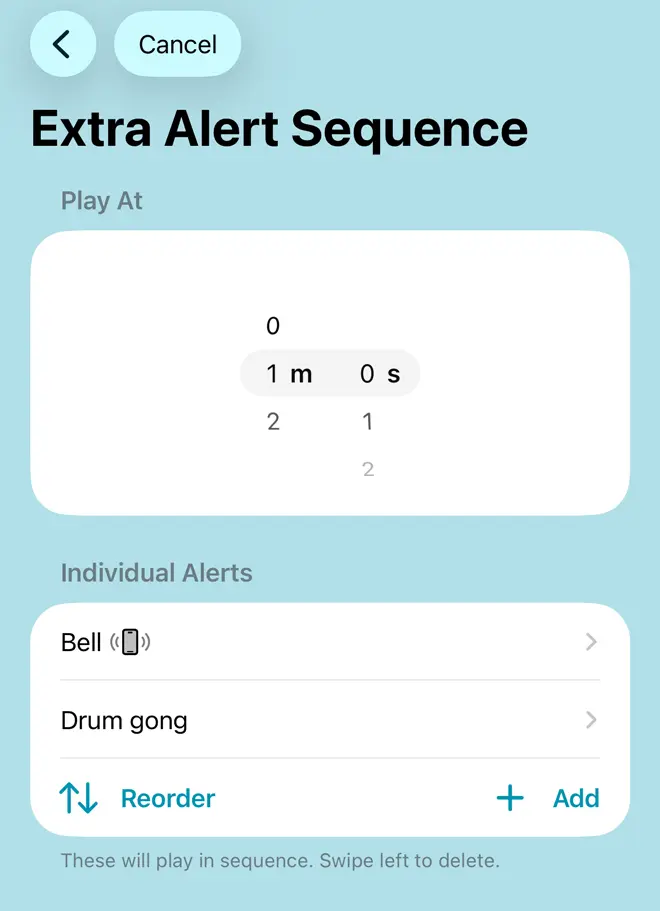
Pick a time at which the alerts will play. This can’t exceed the duration of the hosting countdown timer.
Individual Alerts (2)Set one or more alerts that are played when this extra alert is triggered. Each can be an audio signal, text-to-speech and/or vibration. The alerts will play in sequence every time the element completes: that is for every repetition. You can remove alerts by swiping left, reorder them with the Reorder button and add additional ones with the Add button. Tapping an alert will lead to a configuration screen.
Top